Standing Desk

If you sit all day your health will suffer.  One way to solve this problem is to purchase a standing desk or make your own.  The simplest and least expensive way to do this is to make a tall desk with a height that is approximately two-feet less than your height (give or take a few inches since people aren’t uniform), and then purchase a barstool or drafting chair to sit at.  The general idea is that your elbows should be at right angles when you type.  When you feel like sitting, sit on the barstool at your fixed-height desk, when you feel like standing, push the stool aside.

Depending on your budget, and your work requirements, It is entirely possible for your electrical engineering test equipment to exceed the lifting capacity of standard electric motors.  If it does not, you clearly need to purchase additional test equipment and tools.  You can either purchase a new standing desk frame with beefier lifting capacity (best option), have less stuff on your desk (worst option), or you can create a pneumatic auxiliary lift system that compensates for the additional weight (Most fun option).  In my case, I already had a standing desk frame from another project.  But the frame simply was not strong enough to lift the 1” thick butcher block countertop from the home center, the keyboard and monitor, the 24”x 36” optical breadboard, my amateur radio equipment, an 80lb uninterruptible power supply, and my tool chest full of tools.  And that was without any of my true necessities installed!

I found a different system that could certainly lift things, but I didn’t want to invest an extra $1000 dollars and throw out the old frame.  Something had to be done, and my name is Hard-Way Hughes — so I chose to void some warranties.

For my pneumatically assisted electric lift desk, I used a quiet air compressor, some pneumatic cylinders, an air hose, and an adjustable pressure release valve that allows the pressure to bleed from the system as the desk is lowered. 

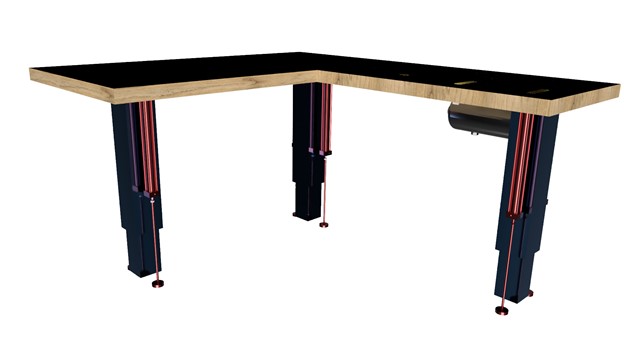
The basic idea is to pass air from a high-pressure reservoir through a regulator to a series of cylinders.  As the cylinders expand, the pressure remains constant and they exert a constant upward force on the lift mechanism and desk to counter the downward gravitational force, making the desk appear to the motors to have less weight, which then allows the electric motors to raise as intended.  When the desk lowers, the pressure increases significantly as the air inside is compressed.  If the pressure is not bled from the cylinder, it will prevent the desk from being lowered.  So the pressure of the relief valves is set ~5 psi greater than the regulators.

Also, if there are large disparities in the weight distribution on your desk, you might have to create “zones” — where cylinders operate at different pressures.

The cylinders do nothing to provide lateral stabilization — so when the desk is bumped or hit with a desk chair, there are substantial forces exerted on the lift mechanism.  The way around this is to anchor the desk to wall studs with some linear drawer glides.

One issue I ran into was off-axis torque provided by the cylinders.  When I initially installed the cylinders I placed them next to and behind the electric motors for aesthetic reasons.  Unfortunately the electric motors act as pivot points, so the single pneumatic cylinders tilted the desktop when energized.  The simple solution to this was to add additional cylinders on the other side of the motor and decrease the operating pressure of the system.  When you add your pneumatic actuators, consider the forces, and make sure you find a way to balance the moment axes.

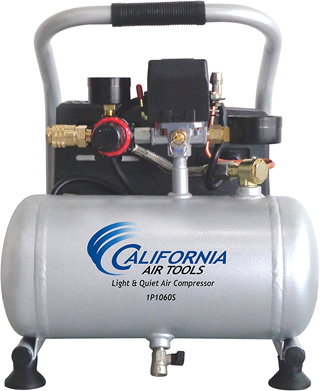
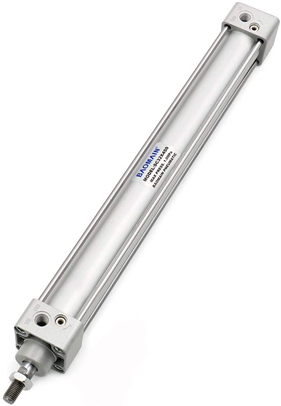
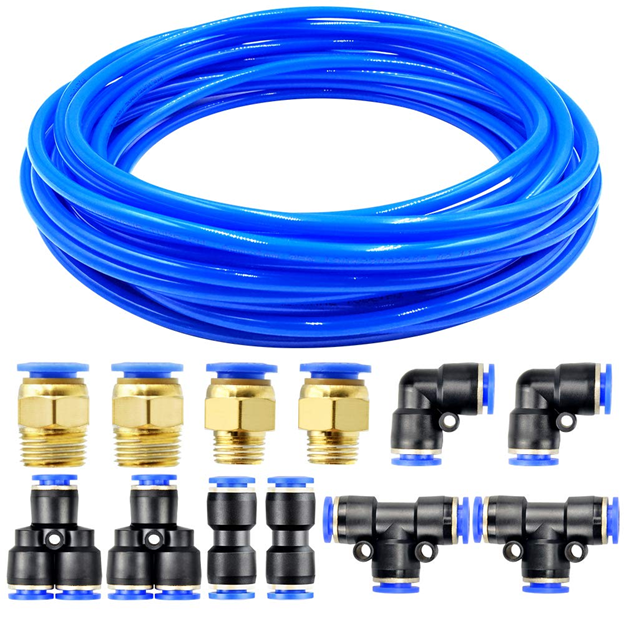
I found quite a few parts, tees, regulators, cylinders, etc… at the local scrap / recycle yard and already had an air compressor in the office, so my out-of-pocket was around $150 for regulators, pressure bleed valves, tubing, and connectors.  Realistically, to duplicate my setup from an online reseller or auction site would probably cost around $350-450.  If you don’t already have access to a standing desk frame, and a useful scrap yard, it will be cheaper, safer, and easier to just purchase new heavy-duty lifting columns and a controller.  It’s just not as fun.   A partial parts list is shown below.

https://www.amazon.com/California-Air-Tools-CAT-1P1060S-Compressor/dp/B01LYHYHEA
https://www.amazon.com/gp/product/B078FTZZ4Z/
https://www.amazon.com/gp/product/B07RJ1BYKV/ref=ppx_yo_dt_b_search_asin_title?ie=UTF8&psc=1
https://www.amazon.com/Control-Devices-Pressure-Relief-Adjustable/dp/B083ZJVQ2J

Recent Posts

Summit Interconnect Acquires Royal Circuit Solutions and Affiliates

The combination solidifies Summit’s position as one of the largest privately owned printed circuit board (PCB) manufacturers in North America with a  footprint that will now encompass eight manufacturing facilities. The acquisition significantly broadens the scope of Summit’s product offering while expanding the company’s business portfolio of key customers and end-markets. Summit Interconnect is pleased… View Article
Read More

Tech Chat with Thermal Expert, Mike Jouppi

Ever wondered how many vias to use in a thermal package? Or how to route high current traces in small spaces? Good news! Mike Jouppi is back! Check back for a recording of this important PCB resource. In the meantime, feel free to download the Thermal Resistance calculator discussed live.  Download Thermal Resistance Calculator
Read More

Flex PCBS: Design Tips and Material Selection Advice – On-Demand Webinar

In today’s high-tech world, electrical engineers have many choices when it comes to designing their PCBs, including what type of laminate to use. Laminates form the foundation for a high-functioning PCB. In this on-demand webinar, learn how to select the right laminate for your project based on material properties, suppliers, types and more.
Read More

Share

Share on twitter
Share on pinterest
Share on facebook
Or use this public share link